
End-to-end (E2E) testing is a software testing methodology that verifies the working order of a software product in a start-to-finish process. It ensures that all components of a system can run under real-world scenarios.
In this article, we will go through the basics of conducting tests using Cypress, focusing on a hands-on approach. Our testing playground? A simple to-do list application built with React. With this in mind, it's essential to note that a basic understanding of React is recommended to fully grasp and follow along with the examples.
Getting Started with Cypress Testing Framework
Install Cypress via npm:
cd /your project path
npm install cypress --save-dev
This will install Cypress locally as a dev dependency for your project. To confirm the installation, you can check the package.json file in the root folder. If the installation was a success, you should see Cypress as one of the dev dependencies installed in your project.
// In package.json
"devDependencies": {
  "cypress": "^13.3.0"
}
Launching the Browser
One of the main advantages of Cypress is that it uses a 'real' browser to run tests. Other end-to-end testing frameworks like Selenium usually use a headless browser to run their tests, which is basically a program that simulates a browser but doesn't display any user interface.
To launch the browser, fire up your terminal and run:
npx cypress openAfter a moment, the Cypress launchpad will open.
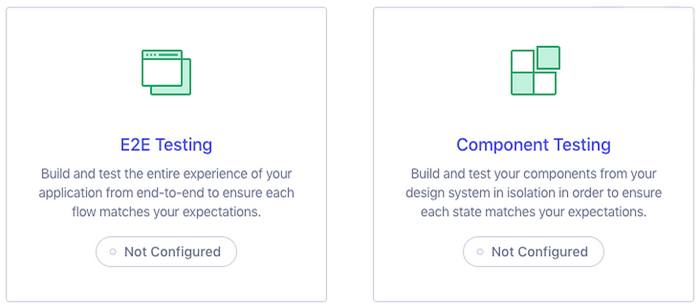
Cypress Launchpad
Referencing the Cypress setup documentation, the role of the launchpad is to guide us through the decision and configuration tasks that are needed before we start writing tests.Writing Tests Using Cypress
Before we write our first test, we need to select the type of test we want to work on; in this case, you can select E2E Testing. When you press the continue button, Cypress configures the project and adds files such as the cypress.config.js and the e2e.js file that will assist us in carrying out end-to-end tests.
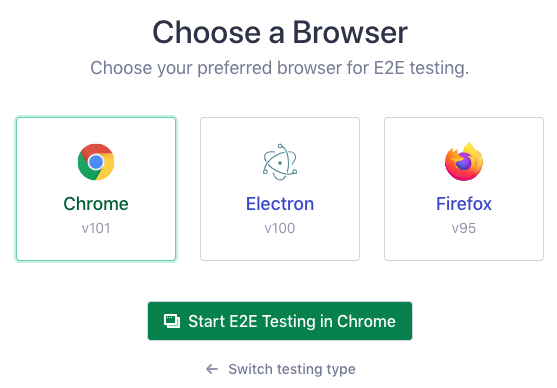
Next, you will be presented with a list of compatible Cypress browsers found on your system. Feel free to choose a browser of your liking but in my case, I will be using Chrome.
Adding a Test File
Assuming everything was successfully installed, we are going to add a test file. After clicking on the “Start E2E Testing” button, you will be directed to a window that offers you two choices: either use scaffold example specs provided by Cypress to create tests or create a new empty spec file. We are going to opt for the latter, so select the new empty spec and enter the path where you want your file to be located. Since we are working with a to-do list, I’ve named it sample, but feel free to use any name that you prefer.
The newly generated test file will be displayed in a confirmation log. You can go ahead and close it. Immediately after this, you should see the test file displayed in the list of end-to-end specs.
Let’s go ahead and click on the new spec and watch Cypress launch it. In this instance, the test will pass successfully as Cypress is not testing our application. Instead, it is interacting with another URL specifically set up by Cypress for testing purposes.
Important Terms and Concepts in Cypress Testing
Tests in Cypress typically contain these general components:
- describe block – where all tests exist. This block takes two arguments: the first is a description of the tests, and the second is a callback function for the actual tests within that block.
- it blocks – primarily located inside a describe block. They represent single tests within an overall test file. The structure of
it()is similar to that ofdescribe. The first argument is the title of an individual test, and the second argument is a callback function containing your code. - Commands & Interacting with Elements – Cypress provides us with various commands to assist in testing elements. These commands can be used on the
cyobject. For example,cy.visit('/')will navigate the Cypress runner to the homepage. Additionally, you can use other commands such ascy.click(),cy.type(),cy.check(), etc. - Getting Elements – You often want to retrieve an element from the DOM and make some sort of assertion. For example, if you want to target an
h1element that contains specific text, you can get the element in Cypress by using thegetfunction and passing in a CSS query selector. - Command Chaining & Assertions – After you get an element, you likely want to perform an action, such as making an assertion. This can be achieved by chaining an assertion after getting an element. For example,
get('h1').contains('text'). - beforeEach – You can use a
beforeEachfunction to perform certain actions prior to every test. - Custom commands – You aren’t just limited to
cy.Xcommands, but you can create your own custom commands. Add your commands tocypress/support/command.js.
Conclusion
Software testing is an essential part of project development that every developer should take seriously. Can you imagine a scenario where the checkout process of an e-commerce website has a bug that goes unnoticed in testing? Without thorough testing, these bugs could cause frustration for customers and potentially result in financial losses for the business.
Need support from expert ISTQB-certified testing professionals? Contact us today for expert consulting. Our team can help you analyze your needs and develop a tailored strategy to maximize efficiency and cost savings.